DIY Wednesday- Upcycled Holiday Centerpiece

With Thanksgiving just one day away, I thought it would be nice to share with everyone what I decided to do for my table’s centerpiece. There is plenty of holiday decor you can purchase to make your table look fabulous, but if you want to be a little crafty, why not try this quick project to make your very own! I made a couple things to piece together and each element of this project can be customized to fit your color scheme or theme!

DIY- Upcycled Holiday Centerpiece

Image

What you will need:

-Bottles (I used two SKYY Vodka bottles with the labels peeled off) -As many as you would like to use!

-Glue (Recommended: E-6000 industrial adhesive -I use it for everything)

-Mod Podge & brush

-1 Hot glue gun-E-6000 can be used if you do not own a glue gun

-1 Pumpkin (or more if you would like!)

-About 7-8 leaves from outside (Preferably ones that are still fresh and not too crispy)

Step 1:

Have you ever tried to use a flame to cut a bottle? This was my first try and it was not as simple as most tutorials make it seem. I had a bit of a jagged edge but since I was covering it, it wasn’t a big deal. Here is a quick how to:

-Fill a small dish with nail polish remover

DSC00531


-Grab some string and wrap it around where you would like the bottle to break. I started with a hemp wire and it did not work at all.  I found using an old shoe lace wrapped 3 times around finally broke the thick bottle!

DSC00534

-Remove the string and dip in polish remover until completely soaked

-Place back on to bottle and light the string

WARNING: Be sure the polish remover isn’t dripping down the bottle as this will also ignite and become quite dangerous to hold. -I know, because it happened to me!

-Hold both ends of the bottle until the flame has spread evenly and goes out.

-Immediately dump the bottle into ice cold water (filled my sink) and the bottle should crack immediately.


DSC00533


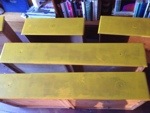
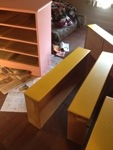
Once this step was complete, I began gluing hemp string around the top of the bottle. Using a hot glue gun (or an alternative strong adhesive) place a line of glue around and follow with the string. Once the first bit is secure, continue to wrap the string around only adding glue when necessary. I used two bottles for this project, both SKYY Vodka bottles. By cutting one bottle and leaving the other, adding hemp tied together both looks!

DSC00537

DSC00536


Next: The Pumpkin!

Since I decided to go for a natural theme for my centerpiece, I collected some leaves and attached them to a white pumpkin. The beauty of this step is that you can customize it however you’d like! Want to add some lace to that pumpkin? Go right ahead! Maybe get a black sharpie or paint and make a unique design. You can even add pearls or rhinestones glued into an elegant swirl!

If you would like to mod podge some leaves, here’s what to do:

1-Collect 7-8 leaves (for a medium sized pumpkin) Make sure you get leaves that are somewhat fresh and flexible without cracking and crumbling.

2-Since some of my leaves were a little weathered, I used the E-6000 glue to place them around the pumpkin

DSC00538
DSC00539

DSC00543


2-Once laid flat, mod podge over the leaves to secure them.

DSC00544

You can also crumble the leaves around the top to fill in some open spaces.

DSC00545


Let this pumpkin dry for about an hour and voila! A unique addition to your centerpiece.

Once finished, I decided to take the tall bottle and add a twig with some berries on it from my yard. The other bottle was filled with water and a floating candle. I added a small ceramic squash candle holder and metal leaves from an old broken fall decor item. I plan to take these items and spread them across the runner on our table for Thanksgiving, making the piece run the length of the table. There are many ways to tackle this project, let your imagination play!

Happy Thanksgiving!!

DSC00549DSC00551

DIY Wednesday: Decoupage Lamps…Thursday Edition!

After battling some technical difficulties, the DIY Wednesday post is back. I apologize for the delay, I’m sure many of you bloggers out there have experienced this scenario: write the whole blog and tags just to have the computer freeze and erase it! twice!! So, without further adieu, DIY decoupage lamps!

What you will need:

Mod Podge (store bought or home made: equal parts elmer’s glue & water) I prefer the store bought gloss finish mod podge

1 Medium Brush

Lamp Shade

Scraps paper, maps, memorabilia, etc -whatever you wish to decoupage! I chose to use some memorabilia:

Two Lamps- Two Themes -Vintage McCall’s Magazine from the 70s and a newspaper from the first day of the first ever US Tomorrowworld Festival.

Step 1:

If you have any sort of lip on the shade make sure to peel it back so that you have a smooth even surface to work with. Cut up any papers or articles you wish to use on the shade to appropriate size. 

ImageImage


ImageImage

Step 2: Begin applying Mod Podge to the shade-work in sections as it dries quickly. Be generous and use enough to get the first piece down.

ImageImage


Step 3: Lay the first piece down and mod podge over the top. Cover the piece completely but try to keep it smoothed out. Don’t worry if there are little creases, they usually smooth out when drying. Continue to mod podge until the lamp is covered.

ImageImage

Step 4: If you have excess hanging over the edge, either cut it to fit or smooth it over to the inside of the shade with mod podge.

Image


Step 5: Let Dry and Viola! Enjoy your new fabulous lamps! Below are some pics of ouImage

ImageImage B

ImageImageImage


If you use gloss finish mod podge, these will dry to a nice shine finish!

Here is a little extra fun find: From the McCall’s magazine- an ad to tell readers that mannequins will be made to model real life women. Love it! Plump is Pretty! 

Image


Happy Crafting! 

DIY Wednesday: Wire Wrapped Earrings

Wire wrapping is something that I’ve been playing around with for a few weeks now. I love wrapping crystals to make pendants and pushing the boundaries to see what I am capable of. While playing around with wire the other night, I fashioned some wire wrapped earrings quite easily! This post is to help any new wire wrappers out there and I hope to inspire some awesome jewelry creations! In addition to these earrings, all of my wire wrapped jewelry is available in my Etsy store at http://www.etsy.com/shop/upcyclellc.

DIY Wire Wrapped Earrings

IMG_3676

What you will need:

Wire -for this project I used 20 gauge bronze craft wire

The Coiling Gizmo – a wire wrapping tool that makes those tight coils in just seconds! -you can opt to do it by hand, but know that it may take a bit longer and the double spiral may be very difficult. This tool can be found locally- (The Rock Garden, Branford, CT) or in most shops that specialize in crystals and wires for pendant making.


Step 1: Take a the wire (i usually don’t cut it so that I can use as much as needed) and tie the end around the coiling gizmo.

Begin to twist it to make a tightly wound coil.

IMG_3656


Step 2: String a new wire through the coil you just wound. Then repeat the first step. Wind the new coil, when you get to the middle, wind the twisted wire to create a larger coil design in the middle.

IMG_3659

IMG_3662


The finished wire should look like this:

IMG_3654


Step 3: Take a few loose strands (I used 3) and twist them together by hand. Once twisted, string this through your coiled wire design.

IMG_3666 IMG_3668


Step 4: Twist the wire at the top to create a loop for an earring hook.

IMG_3671


Additional Step (5): Adding a decorative feature. This is done by winding a new coil with the tool and stretching it out. Once this is done, it can be twisted around the middle of the earring. This keeps the bottom wire from sliding around and adds a little something extra!

IMG_3672 IMG_3673


Step 6: add an earring hook-available at any craft store and you have your very own handmade wire wrapped hoop earrings!

IMG_3676


Have a wire wrapped DIY of your own? Share it here! Hope you enjoy this DIY project!

All my wire wrapped jewelry is available on my etsy shop at http://www.etsy.com/shop/upcyclellc !

DIY Wednesday: Upcycling Distressed Dressers

We have all seen those distressed, forgotten pieces of furniture sitting in Goodwill. Some disregard these old things while others, like myself, feel the need to hoard these end tables and dressers in hopes of restoring them on a rainy day! Well crafters, here is my first DIY furniture edition. I found this old dresser with indents and imperfections when I moved in about a year ago. I always planned to paint it but never knew what to do. Finally, I got some supplies and got to work. Restoring a wooden dresser isn’t as difficult as some may think.

Here is what you will need:
– 1 steel wool brush/pad
– 1 tacky cloth
– 1 drop cloth (or newspaper)
– small rollers (for as many colors as you will choose)
– small brushes (for as many colors as you will choose)
– paint colors of your choice (small containers)

First, you will take all the drawers out and knobs off the dresser and use the steel wool brush to smooth out all imperfections in the wood.

Once this is complete, use the tacky cloth (found at any hardware store), to clean off dresser. Since steel wool can leave behind small slivers, this type of cloth will be sure to get all of it off the wood.

Now, paint! Make sure you buy a paint/primer mix or use a primer base before adding color. This will ensure any forgotten bumps and dings will not be seen.

You may need several coats, I chose some very light colors and used about 3-4 coats for each color.

My color choice was made to match a tapestry hanging above the dresser. Unfortunately, it was a shade too light. I will be repainting the pink with a darker hue to get the desired look. So don’t fret if your colors don’t come out right, this is something you can change quickly!

20131106-082052.jpg

20131106-082103.jpg

20131106-082116.jpg

20131106-082129.jpg

20131106-082139.jpg

20131106-082150.jpg